Glue one of the silver doilies to the lilac poster board, about 1” away from edge. Position doily as shown. Take the second doily and position two large circles on edge directly over the two large circles on right side of glued doily. (See illustration). Glue this second doily in place, leaving two lower right-hand circles free. Position the last doily to line up two large circles underneath the free edge of second doily. Let dry.
Using a straight edge, cut away unwanted portion below center doily. Trim top edge of tiara following lace edge.
Lay headband flat on a table or work surface. Stand up trimmed tiara. then glue to flat surface of the head band. You may have to hold this piece with clamps or clothespins until glue is set. Apply second bead of glue all along inside edge or headband and tiara for strength. Dry completely.
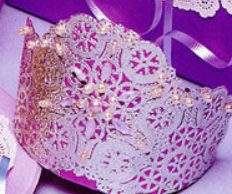
Position large pink pearl in center of the center doily with dab of hot glue.
Position small round Ivory pearl at six points around the large one . Use the doily design as your guide for placement.
Position one pink gemstone al the end of each small ivory pearl.
Position remaining small ivory pearls at edge of tiara, using small doily circle for placement. (See photo)
Position oval ivory beads about 1/4″ from the ends or each pink gemstone.
When the princess is ready to wear her tiara, set the tiara lightly on the top or the head. (Do not use headband in its normal position for holding hair.)
Experiment with your own pearl and gemstone combinations to give a different look.